Good morning, thanks for visiting the Lisa B Designs blog today. Kirsten here with a very special announcement. On Lisa's behalf, I am delighted to welcome a new design team member.
JULIE EMMETT has been attending Lisa's classes in Maidstone for the last few years & this year, she joined us as a team member, assisting during the classes. Now she is joining us here on the blog & her posts will be on Tuesdays. Here's Julie to tell you a little about herself............
JULIE EMMETT has been attending Lisa's classes in Maidstone for the last few years & this year, she joined us as a team member, assisting during the classes. Now she is joining us here on the blog & her posts will be on Tuesdays. Here's Julie to tell you a little about herself............
"Hello, I feel very privileged to have been asked to help on the Lisa B Design Team.
A
little about me.......... I live in Maidstone with my husband and my
son (who has also developed the crafting bug!). I come from a background
of creative people, with my dad a trained carpenter and keen gardener,
my mum an exceptional knitter and good crochet maker, my sister who
excelled at Art an school and is really good at drawing and painting, (plus any other craft thing she turns her hand to), so it's in my blood.
I
loved stationery and pretty papers as a child and used to do paper
swaps back then, not realising I was starting my first paper stash! I love
colour and coordinating items and I have studied interior design.
I have been
making cards for the past 15 years or so and have loved the journey. My
first cards were basic, but my selection of materials was limited along
with my knowledge but that didn't stop me experimenting. These first
cards show me how far I've developed as a crafter and what I've learnt
on this continuing, addictive, journey.
I like stamping but I also enjoy
experimenting with new products or techniques to add variety to my
cards. Inspiration for projects can come from all sorts of sources, from
the garden to 'oh that would be good as.....' and the creativeness then
starts.
I hope you like my future makes and if you have any questions please feel free to ask me."
Thank you, Julie! It is great to have you here.
And now here is Julie's very first project for Lisa B Designs...............

I hope you like my future makes and if you have any questions please feel free to ask me."
Thank you, Julie! It is great to have you here.
And now here is Julie's very first project for Lisa B Designs...............

Here is my first post for the Lisa B DT, I hope
you like it. The topic is rice papers as we used them at the last
class. These papers are very versatile and I have enjoyed working with
them to design my cards. My first card features Imagination Crafts rice paper, Starlights paints & a Card-io Collection's stamp. I'm not normally instantly drawn
to butterflies but the colours in this paper just caught my eye and I
kept going back to it, hence this became my first project.
Anyway, enough from me, this is how I made the card...
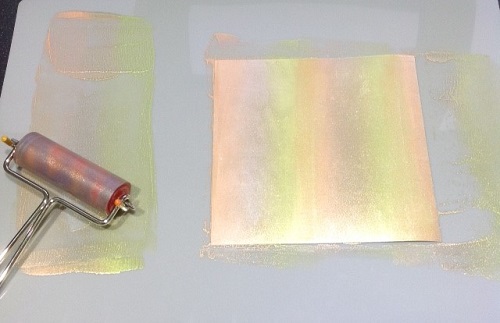
I cut a square of white super smooth card to 160mm/160mm square and a piece of black card to 165mm/165mm square. I then used the spatula to decant the Imagination Crafts Starlights paints - Passion Flower, Silver Gold and Apple Green - onto my non stick mat. I mixed the paints with the brayer and then applied them to the white card, put it aside and left it to dry.

When the Starlights were dry I stamped a greeting from the
Card-io Combinations Say It With Flowers set with Onyx Black Versafine and heat embossed using WOW! Clear Gloss embossing powder.

Then I moved onto the gorgeous rice paper overlaying it onto my card to see which area fitted best and wouldn't cover the sentiment I'd just stamped. With my area of rice paper selected I used a non stick mat and a wet paintbrush to outline my chosen area, I found I used my finger on one hand to hold down the rice paper whilst the other hand was gently teasing the rice paper to get the best tear. Once I'd got the area of rice paper I wanted I set this aside to dry.

I then used my white tile and dispensed a little Imagination Crafts Magi-Bond decoupage glue onto it and used a flat wide paintbrush to paste onto the back of the rice paper, quickly learning this was a lot larger area of rice paper than I'd done before and you need to be quick as the Magi-Bond dries very quickly. (Make sure you have a container with soapy water in beside you to put both your brush and also your brayer in once you have finished using them!)

I then used the brush to smooth the rice paper onto the Starlight background. Whilst it was drying I layered the black card onto a 7x7 white card blank and by the time I had done this the rice paper was dry so I could then stick this with double sided tape onto the black layer. This is all the components put together for the card and it is just the finishing touches to complete the card...........

I used a Pink Lobster Promarker from my stash to do faux stitches around the edge of the card to complement the pink dots in the rice paper, making sure I didn't edge the rice paper. Finally, I added Ranger Glossy Accents (a particular favourite of mine) to highlight the black and yellow butterfly and pull the project together.


Well, this ends my first post, I hope you like it as much as I enjoyed making it.
Have a good day and see you next week.
Love Julie x
The Lisa B Designs annual Craft Extravaganza Day in Fant Hall is on July 23............

Anyway, enough from me, this is how I made the card...
I cut a square of white super smooth card to 160mm/160mm square and a piece of black card to 165mm/165mm square. I then used the spatula to decant the Imagination Crafts Starlights paints - Passion Flower, Silver Gold and Apple Green - onto my non stick mat. I mixed the paints with the brayer and then applied them to the white card, put it aside and left it to dry.
When the Starlights were dry I stamped a greeting from the
Card-io Combinations Say It With Flowers set with Onyx Black Versafine and heat embossed using WOW! Clear Gloss embossing powder.

Then I moved onto the gorgeous rice paper overlaying it onto my card to see which area fitted best and wouldn't cover the sentiment I'd just stamped. With my area of rice paper selected I used a non stick mat and a wet paintbrush to outline my chosen area, I found I used my finger on one hand to hold down the rice paper whilst the other hand was gently teasing the rice paper to get the best tear. Once I'd got the area of rice paper I wanted I set this aside to dry.

I then used my white tile and dispensed a little Imagination Crafts Magi-Bond decoupage glue onto it and used a flat wide paintbrush to paste onto the back of the rice paper, quickly learning this was a lot larger area of rice paper than I'd done before and you need to be quick as the Magi-Bond dries very quickly. (Make sure you have a container with soapy water in beside you to put both your brush and also your brayer in once you have finished using them!)

I then used the brush to smooth the rice paper onto the Starlight background. Whilst it was drying I layered the black card onto a 7x7 white card blank and by the time I had done this the rice paper was dry so I could then stick this with double sided tape onto the black layer. This is all the components put together for the card and it is just the finishing touches to complete the card...........

I used a Pink Lobster Promarker from my stash to do faux stitches around the edge of the card to complement the pink dots in the rice paper, making sure I didn't edge the rice paper. Finally, I added Ranger Glossy Accents (a particular favourite of mine) to highlight the black and yellow butterfly and pull the project together.
Well, this ends my first post, I hope you like it as much as I enjoyed making it.
Have a good day and see you next week.
Love Julie x
The Lisa B Designs annual Craft Extravaganza Day in Fant Hall is on July 23............
During the event day, there will be one-hour workshops, taught by Jenny Mayes of Hobby Art, Georgina Sweetenham of Designs by Georgina & Sue Baker of Imagination Crafts.
Places for each workshop will be £6, are limited to twelve & must be booked in advance. We will post photos of the workshops' projects here & on the Lisa B Designs Facebook page as soon as we have them, but you can book from now, either by telephoning Lisa on 01622 675078, or email; lisabaker1@btinternet.com

Welcome Julie and a fantastic first tutorial, your card's fabulous, love the pretty background and the finishing details not forgetting those gorgeous butterflies 😊
ReplyDeleteSo pleased you have joined the team Julie :o)
ReplyDeleteYour card is beautiful, brilliant use of the rice papers and especially the Starlights background I love it. Look forward to your next project.
Jan xx
beautiful card...thank you for explaining your techniques so clearly.Love the starlight background and those beautiful butterflies.Can't wait to see more from you!!
ReplyDeleteCongrats on your DT appointment! Great start too with this beautiful card...
ReplyDeleteWell done Julie! Fab news! Love the idea of the soft starlight in the background and the papers on top xxx looking forward to seeing all your makes xx
ReplyDelete